DIY Drill Charging Station


By John_Malecki Youtube.com/johnmaleckibuilds Follow
More by the author:

About: Former NFL Offensive lineman turned Furniture maker. I am self taught and sharing my experiences with the world! More About John_Malecki »
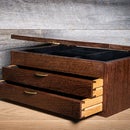
Over the last few years I find myself collecting more and more drills and drivers. With that comes storage, and the old way I was storing it wasn't cutting it anymore. So I build a big drill charging station to hold all my cordless drills and drivers, as well as all of their chargers! This thing has lots of storage and is a big space saver in the shop. Check it out Here!
FULL PLAN DOWNLOAD
If you're looking to tackle this project you should check out these tools!
MY WOODWORKING TOOLS!
- Track Saw
- 23g Pin nailer
- Jointer
- Planer
- Table Saw
- Miter Saw
Step 1: Break Down Sheet Goods
I begin by breaking down the sheet goods to rough dimensions with my track saw, then final dimensions on the table saw and miter saw.
Step 2: Layout & Cut Dados
Layout 3/4” dados using a table saw or a router. *CUT ALL DADOS 1/3 THE THICKNESS OF THE MATERIAL roughly 1/4”. Be sure to measure the distance between each dado, it is a common mistake to rely on your table saw fence and make a mistake. Be sure to use your tape measure to measure to the outside of your dado stack, to the fence.
Step 3: Cut Angles & Rip Top
- Mark down 3” from the top and cut the angles for the sides and the inside shelving. I use my track saw for this, but you can use a jig on the table saw, jig saw, or bandsaw.
- To match the face of the box. Use a straight edge and a bevel gauge to transfer the angle to your table saw. Rip the top on your table saw or with your circular saw .
Step 4: Pre-Drill & Attach Hangers
- Pre drill from the bottom the holes to mount the vertical hangers
- After Pre-drilling the holes attach To the dado slots using glue and 1 1/4” Screws. Be sure to countersink your screws on the opposite side
Step 5: Assemble Carcass
- Assemble the outside and back of the cabinet together. Using glue in the dados on the sides and use countersunk screws from the outside evenly spaced. Then attach the back using glue and countersunk screws
- With the sides assembled, trim off the excess from the tops with a flush trim saw. Then pre-drill and assemble the interior shelf using glue and screws. Be sure to countersink all screws.
Step 6: Face Frame Assembly
- I mill the stock for the assembly at this step. I plane everything down to 3/4" thickness and rip it down to 3/4" thickness.
- I cut the face frame referencing the carcass. Then attach it with glue and 23g pin nails.
Step 7: Pre-Drill & Attach Hangers
- Pre-Drill the hangers and attach using a spacer to make sure they're perfectly centered\
- Sand the cabinet to 120 grit and then finish with your favorite finish.
- hang your unit and fill it up
For more detailed step by step and downloadable PDF Check out the full plan !
FULL PLAN DOWNLOAD
Check out some other shop storage projects!
- Outfeed Table Storage
- Adjustable Clamp Rack
